APPLETS


JAGUAR PRO ONLY

The APPLETS are small, round tool windows for extended JAGUAR control.Many of the functions included in the applets can be controlled via other JAGUAR bars/displays, but the applets are convenient as they can be positioned anywhere on the screen.

HOW TO


TOOLBAR > APPLETS

The applets can be invoked individually from TOOLBAR > APPLETS. The applets appear first in their base locations in the centre of the screen; the applets located in these base positions will not be remembered at JAGUAR restarts. Every applet becomes permanently active if you relocate it by dragging and moving it with the mouse to any location on the screen.

If you want to hide the active applets temporarily, click the TOOLBAR > CLEAR icon or right-click the TOOLBAR > APPLETS icon. Click the icon (or right click the APPLETS icon) once more to make them visible again.

Right-clicking an applet itself removes it from the screen and de-activates it. JAGUAR will remember the screen positions of all the active applets after a restart.

Here is the current applet portfolio:

FILTER

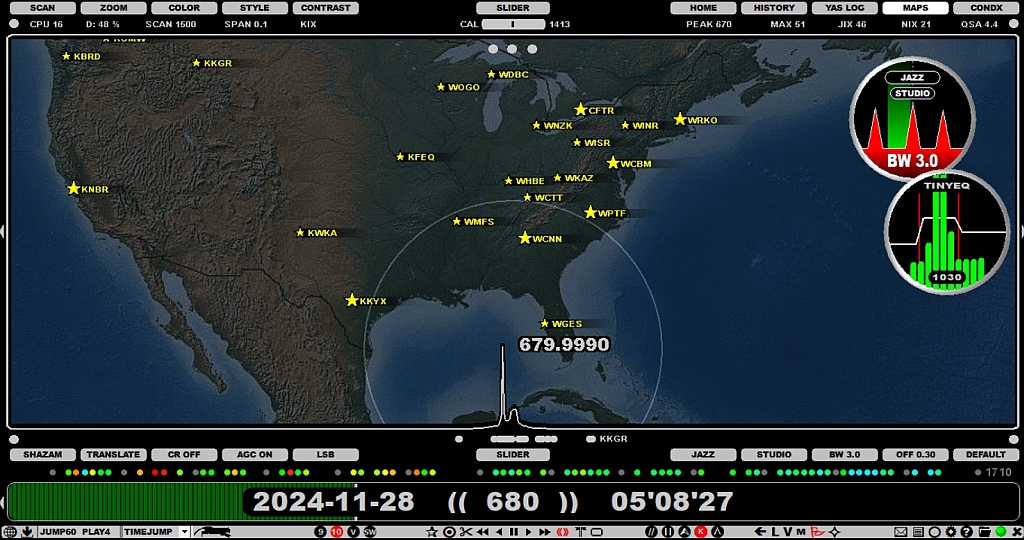
FILTER, RF filters. You can rotate all the available filters by clicking on the filter name button on the top. You can also rotate the filter mode (BASE/STEEP/STUDIO) by clicking the button below the filter name button. The bandwidth (BW) of the currently active filter is shown on the bottom of the applet (and on AUDIOBAR); the offset of the currently active filter is shown only on AUDIOBAR. Note that also the AM MODE filter has an "offset"; it is the shift of the filter center from the nominal.

You can change the SSB mode by clicking the left (LSB) or the right (USB) side of the applet (not available for the AM MODE filter).

When you hover the mouse over the applet, and one of the filter edges will be shown as red, you can:

Note that filter characteristics (name, bandwidth, offset and and the BASE/STEEP/STUDIO mode) can also be changed via AUDIOBAR.

TINYEQ

TINYEQ, Tiny Equalizer is a simple 3-band equalizer which shows 10 audio frequency group bars. You can increase/decrease each of these frequency bands by moving the mouse over the band limit (the red line) and scrolling the mouse wheel or the left/right arrow keys. The band limit frequency is then shown on the top area. The number at the bottom of the applet shows the current maximum frequency in the audio spectrum. If that frequency remains unchanged, it usually means that the use of the notch is required.

When you have selected the bands you want to control, you can just move the mouse over that band area and increase/decrease the power of all the audio frequencies within that band with the mouse wheel or the left/right arrow keys.

If you move the mouse to the bottom and click "RESET", you can reset all 3 bands to their normal state. TINYEQ is probably the smallest and simplest possible equalizer that can exist. Nevertheless, it seems to be very efficient: the best way to test it is to tune in to a fully free frequency with plain noise. It is amazing how the noise level/quality varies depending on the selected equalizer settings.

However, normally, there is not much more you can get out of the audio itself by using a plain equalizer but sometimes it can be beneficial in shaping the "color" of the background noise.

The equalizer is always disabled when the TINYEQ applet is not visible.

SPACE WX

SPACE WX. Space weather center, reporting a selection of space weather indices. This service is enabled by default (it can be disabled via SETTINGS > KIT > OPTIONAL > SOLAR_DATA > NO). If enabled, in the LIVE mode, the current values will be shown, whereas in the ARCHIVE mode, the values at the time of the recording will be shown.

By default, this applet shows the SOLAR WIND value but you can toggle SOLAR WIND and ALL DATA by clicking on the applet.

There are four parameters which illustrate the current space weather in numbers and colors. The Bz value shows the current direction of the interplanetary (= the Sun's) magnetic field. When the Bz value turns to high negative values, it means disturbed conditions. KYOTO DST is a well-known indicator for trans-Atlantic openings, together with POLAR (= Tromsø, Norway) A and K values. Highly increased PROTON flux values typically result in radio black-outs in the polar cap area. The threshold for storms is 10.

The following color scheme is used: GREEN = normal, YELLOW = unsettled, RED = storm/alert.

The "SPACE WX timestamp" is shown on the bottom of the applet in the ALL DATA mode.

S-METER

S-METER, Signal Strength Meter with a one-decimal (or two in GAUGE) accuracy. JAGUAR uses this format instead a more commonly-used dBm for displaying signals strengths. the S-METER applet has two different display formats available (the format can be changed by clicking on the applet): DIGITAL (default) > GAUGE.

WAVE

WAVE, Dynamic waveform for the last second played. If the audio has no issues, the background color of the applet is black. A red flash is a sign of an AGC hit, and a yellow flash is an AGC warning. A clear audio is shown as a continuous steady sinewave but this is seldom achieved with DX signals. Instead, the waveform is often irregular, trashy and/or full of noise.

CR (Click Remover). If you hover the mouse over this applet and scroll with the mouse wheel or the left/right arrow keys, you can fine-tune the level of click removals. Sometimes, a signal can be very low but there can be clicks just above the overall signal level, and you may need utmost fine-tuning. If CR is active, you can see the areas of effect: the grey hatched area can be scrolled up/down defining the CR cut limits, and when CR kicks in, this area is shown in red. In theory, CR is meant only for "independent clicks" in the audio (caused by horse fences, etc.); however some users have found it beneficial also in smoothing static crashes and splatters. But the cut limits must be far enough from the audio itself; otherwise CR will start to eat the real audio parts, too.

If you have activated CR, clicking the WAVE applet gives you another tuning tool: you can define the duration of CR operations. If the system has already made one or more CR cleanups, the real effect of the last CR process on the signal is shown on the WAVE applet: red spectrum shows the original audio, and the white spectrum shows the resulting audio after the CR process. The CR process cleans all the audio samples to zero (as seen in the example), and you can finetune the duration by keeping the mouse over the WAVE applet and scrolling the mouse wheel or left/right arrow keys. The duration of the CR process can be between 1 ms and 6 ms; clicks in the audio typically are 3-4 ms long.