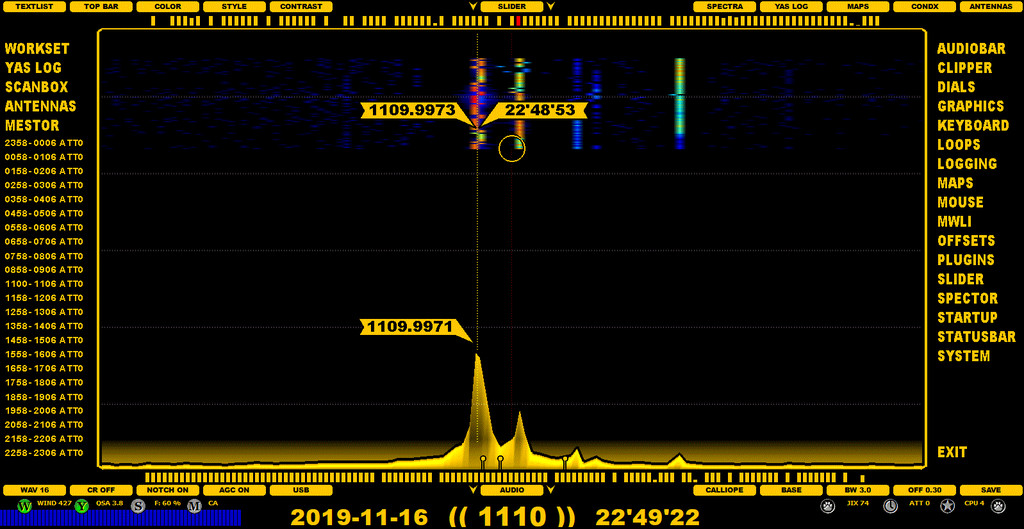
JAGUAR's basic SETTINGS are controlled in the SETTINGS dashboard which consists of two panels, the left and right panel.
On the left, there is a menu for the "server" settings (WORKSET, YAS LOG, SCANBOX, ANTENNAS, MESTOR) and the currently-active recording scheduler list. On the right, there is a menu for all the "client" (= mostly playback-related) settings.
The settings defined in the left/right SETTINGS panels are always used as your defaults when JAGUAR is started. Some of the settings can also be changed via the buttons on SLIDER and AUDIOBAR, but those changes are valid only for the duration of the current session. When JAGUAR restarts, they are overridden by the settings defined via the SETTINGS panels.
In JAGUAR LITE, only the WORKSET and MESTOR settings can be modified.
The basic settings can be changed by clicking the SETTINGS icon on TOOLBAR: the SETTINGS panels will be opened. Clicking any of the menu entries will open a "setting window" where the specific settings related to that group can be set and changed.
JAGUAR also has "quick launch buttons" on STATUSBAR for the most important "server" settings (WORKSET, YAS LOG, SCANBOX, MESTOR). See GUIDE > STATUSBAR for details on the W, Y, S and M buttons.
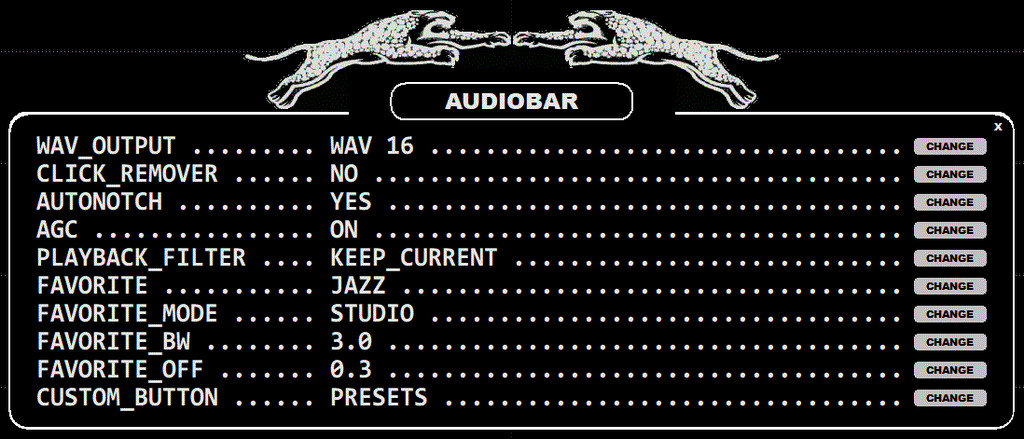
All the setting panels use the same display format. Each parameter can be set/changed by left/right-clicking the CHANGE button. Some parameters have only the YES / NO (or ACTIVE / INACTIVE) values; some parameters can have many pre-defined allowed values. These values can be rotated by a mouse left-click (next value), by a mouse right-click (previous value), or the values can be scrolled using the mouse wheel and/or the left/right arrow keys. Furthermore, some parameters will prompt a text box into which you must enter the desired parameter value (e.g. the disk/folder name used for saving the recordings). In these cases, the changes have to be confirmed by clicking SAVE.
For example, the SETTINGS > AUDIOBAR window can look like this:
The parameters of the left-hand-side settings panel are described separately in GUIDE > WORKSET, GUIDE > YAS LOG, GUIDE > SCANBOX, GUIDE > ANTENNAS and GUIDE > MESTOR help sections.
The lower area in the left panel shows your currently-active scheduler action list (the time slots to be recorded next).
The parameters of the right-hand side settings panel are described as follows.
WAV_OUTPUT ......... WAV 8 | WAV 16 | WAV 32 or WAV 10 | WAV 20 | WAV 40
The sampling rate for the audio output: 8 / 16 / 32 kHz when the 1.6-MHz bandwidth is in use, or 10 / 20 / 40 kHz when the 2-MHz bandwidth is in use. There is no "best" sampling rate, your preferences may vary. More about this in GUIDE > AUDIO.
CLICK_REMOVER ..... NO | LEVEL 1-9
Click Remover OFF (NO), or the click removal level by scrolling the button (the allowed values: LEVEL 1 <> LEVEL 9). More about this in GUIDE > CR and GUIDE > APPLETS > WAVE.
AUTONOTCH ..... ... ON | OFF
This enables/disables JAGUAR's AUTONOTCH. JAGUAR also offers a maximum of 20 manual notches, and they must be invoked in AUDIO WINDOW. See GUIDE > NOTCH for more details.
AGC ............... ON | OFF | OFF+
Automatic Gain Control, rotate the AGC mode: AGC ON > AGC OFF > AGC OFF+. More information in GUIDE > AGC.
PLAYBACK_FILTER ... KEEP_CURRENT | FAVORITE | CUSTOM_FREQS
Decide what filters will be used when you tune in to a new frequency. KEEP_CURRENT keeps the currently-used filter settings, FAVORITE restores your favorite filter settings, CUSTOM_FREQS loads the previously saved frequency-based filter settings (if any). Otherwise, the favorite settings are used.
FAVORITE .......... STOCK | JAZZ | CALLIOPE | AM MODE
Your favorite filter.
FAVORITE_MODE ..... BASE | STEEP | STUDIO
Your favorite filter mode (filter curve).
FAVORITE_BW ....... X.X kHz
Your favorite filter bandwidth.
FAVORITE_OFFSET ..... X.X kHz
Your favorite filter offset.
CUSTOM_BUTTON ..... PRESETS | RESET | SAVE
Select the function mode for this button.
CLIPNAME ..........
Override the default clipname with your own naming format. When making audio clips with CLIPPER, the default naming format is:
DATE TIME CLIP FREQ.MP3
or, if you have clicked the station name on the map, or in the station database before starting CLIPPER:
DATE TIME NAME FREQ.MP3
You can customize the default name, using 4-character symbols:
#FREQ #DATE #TIME #NAME #CALL #SSB #LPRF (=log profile) and literals
For example, if you want your audio clip names to start with the frequency and use underscores in the name so that the clip files can be used in URLs, you can create the following naming template:
CLIPNAME=#FREQ_#CALL_#DATE_#TIME_IPA.MP3
which will generates clip names such as "1030_WBZ_2015-11-08_06'00'00_IPA.MP3"
CLIP_FOLDER ........ Path-to-clip-folder
By default, the SAVE function of CLIPPER saves the audio clips to the CLIPS folder located in the JAGUAR installation folder. You can override this default folder here. In addition, if you have defined LOGPROFILEs, there can be a maximum of three separate clip folders (CLIPFOLDER1=, CLIPFOLDER2= and CLIPFOLDER3=), one for each LOGPROFILE. More details in GUIDE > LOG PROFILES.
CLIP_ARCHIVE ...... Path-to-clip-archive
Your audio clip archive folder, used by CATBOOK. See GUIDE > CATBOOK for details.
MP3_TAGS .......... YES | NO
If enabled, basic MP3 tags will be embedded to MP3 audio clips: TITLE = base frequency, ARTIST = station name, ALBUM = date/time stamp. Most MP3 players can display this data in various ways.
See GUIDE > DIALS for details.
FAT_TOP ...... YES | NO
If enabled, SLIDER will never cover DATABASE BAR, instead when SLIDER is closed, it is docked below DATABASE BAR.
FLAGSPOT ...... YES | NO
If enabled, a flag marker is shown at the "runspot" (playback position) on the SPECTRA and YAS displays.
SCOPE_STYLE ...... DEFAULT | YAS
If YAS is selected, the SCOPE bars are shown in the YAS format.
BOTTOM_SCOPE ...... YES | NO
Set this to NO if you do not need the bottom scope.
ANTENNAKEYS ...... YES | NO
If enabled and ANTENNAS have been defined, the PF (function) keys can be used as antenna switchers.
DELETEKEY ...... YES | NO
If enabled, pressing the DELETE keyboard key will delete the currently-playing file. A confirmation box will be always displayed before the deletion.
SPACEBAR...... LOOP | JAGASS
Define what happens when the spacebar is pressed. See GUIDE > JAGASS for details.
S-KEY ...... SCANBOX | SCOPE | SIXPACK | SETTINGS
Define the display to be opened/closed when the "s" key is pressed.
M-KEY ...... MAPS | MESTOR | MINIMIZE | MIDGET
Define the display to be opened/closed when the "m" key is pressed.
AUTOLOOP ...... YES | NO
If enabled, a loop around TOHs (top-of-the-hours) and BOTs (bottom-of-the-hours) will be created when the opened playback file contains a TOH or BOT.
TOH .............. Starttime,endtime
Define the time period for audio looping around the top of the hour. The default TOH LOOP is from XX:59:40 to XX:00:05. You can increase/decrease the duration. For example, TOH .... XX:59:30-XX:00:30 overrides the default TOH LOOP with the new values ranging from XX:59:30 to XX:00:30.
BOT .............. Starttime,endtime
Define the time period for audio looping around the bottom of the hour. The default BOT LOOP is from XX:29:50 to XX:30:10. You can increase/decrease the duration. For example, BOT .... XX:29:30-XX:30:30 overrides the default BOT LOOP with the new values ranging from XX:29:30 to XX:30:30.
WWI .............. X seconds
By default, pressing the spacebar creates a "What Was It" audio loop. The default duration is 10 seconds but you can change this value. The WWI values between 0 and 10 seconds are allowed. 0 (zero) means that the WWI audio loop is disabled, i.e. pressing the spacebar will be ignored.
LOGTAG ...... Px (COLOR)
JAGUAR will use (P4) BLUE for the logged stations on MAPS / TURTLE by default. This can be overriden with LOGTAG. For example, P3 (BLACK) will change the default to black.
LOG_AND_CLOSE .............. YES | NO
If enabled, JAGUAR closes LOGBOX/CATBOX automatically after SUBMIT/SAVE.
LOGMODE .............. Parameters
You can customize the default log format JAGUAR produces in many ways. For example, if LOGFORMAT=OLL is used, JAGUAR will create log rows which are compatible with the OLL logging system. Also, the output row can be freely customized with fixed literal strings and LOGMODE parameters. Each parameter is four characters long, preceded by #. JAGUAR translates the parameter name to its value while logging. The valid parameters are as follows:
#NAME #FREQ #DATE #TIME #CALL #ITUC #USER #USRN #OFFS #QSAC #ZONE #YYYY #MMMM #DDDD
#HHHH #MINS #MNTH #SECS #FILE #LINE #DIST #COMM # TENT #SINP #CALX #NAMX #LPRF #TABS
For example, when
LOGMODE=#FREQ #TIME #NAME #COMM #USER
is defined, LOGGERBAR generates log lines with frequency, time, station name, comments and userid.
LOGMODE=#FREQ;#CALX;#NAMX-#COMM;#SINP;#HHHH#MINS;#DDDD/#MMMM;USER
This setting will generate an optimal logging line for the MWC log format; #CALX and #NAMX will generate strings designed for MWC in mind. USER must be replaced by the user initials used in MWC, which may be different from #USER which generates the JAGUAR userid. All values are separated by a semicolon, so the output file can also be loaded to Excel.
LOG_FOLDER .............. Path-to-log-folder
By default, all JAGUAR-generated logs are saved in the LOGS folder under the JAGUAR installation folder. You can override this default folder with this parameter.
MAP_STYLE .............. STANDARD | TOPOGRAPHIC | TERRITORIAL | DARK NEON
Define the desired map presentation style.
NIGHT_CONTRAST .............. LEVEL 0-10
Define how dark the night areas will be displayed.
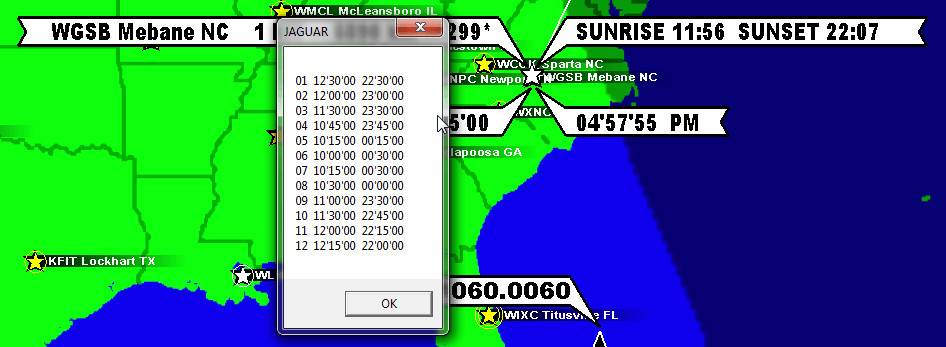
STATION_POINTER .............. MINI FLAG | STANDARD | STANDARD with US EXTENDED
Select the desired presentation format for the station pointer on the maps:

Tip for NA DXers: if you tick SETTINGS > GRAPHICS+ > STICKY POINTER, you can use a special function related to US EXTENDED pointer. When STICKY POINTER is activated, the station pointer remains visible when you move the mouse away from the station. Now if you move the mouse over the FCC data and click it, you will get the "FCC TABLE" (i.e. LSR / LSS times for each month for this station; these times are the official signoff/signon times for daytimers, with some exceptions).
MAP_TIMES .............. YES | NO
If enabled, the Great Circle Line / NOX time / sunrise and sunset times at rx QTH are shown when the mouse is hovered over a station on MAPS. The NOX time (shown along the line as a red ball) is the midnight time at the geographical midpoint between the Transmitter and the Receiver QTH. Experience has shown that the midpoint midnight can be one of the best potential times to catch good "ultra-long" MW DX stations from the other side of the globe.
US_PATTERNS .............. NO | ALL PATTERNS - DAY | ALL PATTERNS - NIGHT | MOUSE CURSOR - DAY | MOUSE CURSOR - NIGHT
Select the mode how the covera area patterns are shown when you tune in to a new NA frequency. If MOUSE CURSOR ... option is selected, the pattern is shown only when the mouse is moved over some specific station on the map.
FULL_CROSSHAIR .......... YES | NO
If enabled, also the horizontal mouse cursor line is shown on the SPECTRUM displays.
STICKY_POINTER .......... YES | NO
If enabled, the station pointer on MAPS will stay visible for the pointed station until a new station is selected by moving the mouse over another station.
ROW_HILITE ................ YES | NO
If enabled, the "Hilite the current row" feature is activated on the TURTLE database.
FIXED_MOUSE_FLAG .......... YES | NO
If enabled, the cursor flag position is fixed, on the top of the spectrum display.
REVERSEWHEEL ............. YES | NO
If enabled, the direction of mouse scrolling is reversed in the main operations.
RIGHT_CLICK .............. JUMPERS | TOP MENU | MOUSETRAP | LSB <> USB | SPECTRA | CUSTOMKEY | MIDGET | FLAGS
The RIGHT_CLICK functionality of the mouse on the background screens ("WALLPAPERS") can be selected from the following options:
JUMPERS: Open/close the big JUMPER buttons
TOP MENU: Open/close the main top menu
MOUSETRAP: Re-locate the mouse to the rightenmost PAWBUTTON (basebutton)
LSB <> USB: Toggle between LSB and USB
SPECTRA: Right-clicking toggles HOME <> HISTORY
CUSTOMKEY: If you set this option, JAGUAR will ask you to press the keyboard key you want to bind the RIGHT_CLICK to. After this binding, the mouse right-click on the graphics area will always invoke the function bound to the selected keyboard key
MIDGET: Enter the MIDGET mode where JAGUAR continues the playback with the basic functions while you can focus on using some other application at the same time
FLAGS: Show/hide the offset flags
If you want to submit your loggings to MWLI, you will need to set your MWLI email address and omid. See GUIDE > MWLI for details.
OFFSET_BAR .............. YES | NO
If enabled, the "offset bar" (gradient color bar) will always be visible, i.e. the area where the mouse shows the red "offset flag"
OFFSET_PEEK .............. YES | NO
If enabled, JAGUAR will show the stations which are listed on the exact offsets pointed by the mouse. These stations are shown next to the mouse cursor line when you move the mouse on the OFFSET_BAR area on the spectrum displays.
SHORT_FLAG_NAMES ............ YES | NO
If enabled, JAGUAR will show the global flags with short text labels (the exact frequencies are not included in the text).
FULL_SIZE_PINS ........... YES | NO
If enabled, your own offsets will be shown as big "tower" markers.
See GUIDE > PLUGINS for details.
TEXTLIST .............. DAYLOG | MWLI | DISTANCE | VOYAGER | OFF
Text list overlay mode. DAYLOG, MWLI and VOYAGER have separate detailed GUIDE sections.
TOP_BAR .............. SCOPE BAR | TITLE BAR | MSG BAR | OFF
Set the TOP BAR mode. More details in TOP BAR.
COLOR .............. ICE BLUE | WHITE | GREEN | GRAY | YELLOW | BLUE
JAGUAR's color theme.
SPECTRUM_STYLE ............ STANDARD | GLOW | XRAY | CATWALK
The style how the spectrum is presented. More information in GUIDE > XRAY and GUIDE > CATWALK.
SPECTRUM_CONTRAST ........... X.X
The default value for the spectrum gradient color power ("contrast"). Define a low value in the high-signal-level areas and higher value in the low-signal-level areas. SPECTRUM_CONTRAST is the general default value used for spectra when JAGUAR is started. Normally, the optimal CONTRAST value depends on the spectrum style used and the frequency. CONTRAST can be be finetuned via SLIDER > CONTRAST during the DX session whenever needed.
FAST_CALIBRATE .............. Frequency (or list of frequencies separated by comma) used in calibration
Frequencies are given with four decimals, e.g. 828.0000 (single frequency) or 828.0000, 899.9988, 1341.0001 (frequency list). If a single frequency is given, clicking TOOLBAR > KALIBRATION makes the calibration using that frequency, but if a list of frequencies is given, clicking TOOLBAR > KALIBRATION gives a popup menu for selecting the frequency used for calibration. More details in GUIDE > KALIBRATE.
AUTO_CALIBRATE .............. YES | NO
If enabled, automatic calibration will be performed all the time in the background, based on the current calibration frequency. The default is NO. AUTO_CALIBRATE = YES is useful only if you have a stable calibration frequency or an external GPSDO; otherwise this continuous auto-calibration mode may cause annoying left-right spectrum jumps on the display. AUTO_CALIBRATE cannot be used if FAST_CALIBRATE is not enabled.
DOWNSIZE .............. YES | NO
If enabled, SPECTOR peak sizes are cut to half, and you will get more graphics area visible
TOP_SPECTOR .............. NO | SINGLE_FREQ | FULL_MW
If enabled, you can select either "SINGLE_FREQ" mode (a mirror image of the standard SPECTOR on the top of the display) or "FULL_MW". In the FULL_MW mode you can select also the "spectrum speed" (button on the right): SLOW | FAST | REAL (real time). When the SLOW mode is selected, the strongest station (frequency) on MW is listed next to the corresponding peak.

TRANSPARENCY ............ YES | NO
If enabled, SPECTOR peaks are displayed transparent, i.e. FLAGS, etc. can be seen behind the SPECTOR peaks.
SPECTOR_SHADOW ........... YES | NO
If enabled, the SPECTOR area is filled with a gradient color.
SPECTOR_SIGHT ........... YES | NO
If enabled, a "rifle grid" is shown around the nominal frequency.
SPECTOR_SIZE ........... SMALL | MEDIUM | BIG | GIANT
The default SPECTOR (and spectrum) display resolution.
START_AS .............. HOME | HOME AS HORIZONTAL | YAS | MINIMIZED | U-96
Select the display screen what is shown right after the JAGUAR start. If START_AS MINIMIZED is selected, JAGUAR will stay idle (no connection to Perseus) until a playback or recording request is activated.
U-96 combines several visual options, the result resembles a sea view by night from a submarine perspective.
START_INFO .............. NO | 1-15 SECONDS
If enabled, INFOBOX will be shown for the selected duration at the JAGUAR start.
START_MESSAGE .............. NO | Audio message text
If any text is given, that message will be played at the JAGUAR start.
SOLAR_DATA .............. WIND | COLORS
Define the format how the solar data will be presented on the STATUSBAR when SETTINGS > YAS LOG > SOLAR_DATA has been activated.
QSA_GAIN_SIR .............. QSA | SIR | GAIN
Select the information you want to see on this specific statusbar area (see GUIDE > SIR for details about Signal-to-Interference-Ratio).
LEFTPAW .............. DEFAULT | User defined
If changed from DEFAULT (= "w", WALLPAPER), JAGUAR will ask you to press the keyboard key you want to bind the LEFTPAW left-click to. After this binding, LEFTPAW left-click will invoke the function bound to the selected keyboard key.
RIGHTPAW .............. DEFAULT | User defined
If changed from DEFAULT (= "p", PREV FILE), JAGUAR will ask you to press the keyboard key you want to bind the RIGHTPAW left-click to. After this binding, RIGHTPAW left-click will invoke the function bound to the selected keyboard key.
LEFTPAW_RCLICK .............. DEFAULT | User defined
If changed from DEFAULT (= "q", CONTINENT), JAGUAR will ask you to press the keyboard key you want to bind the LEFTPAW right-click to. After this binding, LEFTPAW right-click will invoke the function bound to the selected keyboard key.
RIGHTPAW_RLICK .............. DEFAULT | User defined
If changed from DEFAULT (= "n", NEXT FILE), JAGUAR will ask you to press the keyboard key you want to bind the RIGHTPAW right-click to. After this binding, RIGHTPAW right-click will invoke the function bound to the selected keyboard key.
HOMESCAN .............. NO | XX SECONDS
If enabled, you can define the "density" of the HOMESCAN spectrum run. See GUIDE > HOMESCAN for details.
AUTOSAVE .............. YES | NO
If enabled, JAGUAR saves the HOME spectrum periodically. HOME spectrum displays can also be saved manually by clicking TOOLBAR > SAVE.
TRACKER .............. YES | NO
If enabled, JAGUAR collects playback history and shows it on the TRACKBAR. See GUIDE > TRACKBAR for details.
TOOLTIPS .............. YES | NO
If enabled, short help texts will be shown when the mouse hovers over the buttons on SLIDER / AUDIOBAR / STATUSBAR / TOOLBAR.
MAX_CPU ................ YES | NO
If enabled, the CPU is fully utilized in audio de-modulation. If you disable MAX CPU, you will achieve some savings in the CPU usage as some calculations are skipped in audio processing. Normally, they go unnoticed in the final audio.
CONFIRMATIONS .............. YES | NO
If enabled, extra confirmation popups will be shown in some functions.
END_OF_FILE .............. NEXT | KEEP | FQUP |FQDN
Define what happens when the playback reaches the end of the file. By default, JAGUAR continues to play back the next file (NEXT) when the end-of-file is reached in the current file. This behaviour can be changed with this parameter.
The other options available are:
- KEEP: Return to the beginning of the file on the current frequency.
- FQUP: Increase the frequency according to the selected frequency-stepping.
- FQDN: Decrease the frequency according to the selected frequency-stepping.
KEEP_MAXIMIZED .............. YES | NO
If enabled, JAGUAR will stay in the full-screen mode. JAGUAR will not automatically enter the minimized mode. Normally, the minimized mode is invoked if there is no user activity in one hour. It is not recommended to keep this enabled in unattended operations: the minimized mode minimizes the resource consumption.
BANDSTOPPER .............. YES | NO | CIRCULAR
Controls how the frequency-scrolling behaves when either end of the MW band is reached. The default is CIRCULAR, i.e. the circular mode: when either end of the dial is reached, the control jumps to the beginning/end of the dial. YES stops scrolling when the end of the dial is reached. NO allows the user to access the "grey area" of the bandwidth, i.e. outside the alias-free area of the wideband recording.