
JAGUAR KIT is the tiniest independent recording scheduler on the market for the PERSEUS SDR, with many built-in features, including:
In addition, JAGUAR KIT can generate
This information is collected automatically even if you are not a registered JAGUAR PRO user/don't have the JAGUARKEY file installed. However, in order to utilize this additional data, you need the JAGUAR PRO software.
JAGUAR KIT is the successor to the popular MESTOR software. The software is designed for medium-wave DXing only, and it supports two sampling rates (1.6 MHz and 2 MHz) only.
JAGUAR KIT is ideal for those who appreciate a light-weight and stable solution for their overnight PERSEUS recordings, thus especially offering an excellent solution for unattended remote stations running 24/7.
JAGUAR KIT requires that the PERSEUS SDR drivers have been installed but it does not need or use the PERSEUS software or JAGUAR software. The KIT itself is portable, e.g. no Windows registry used.
JAGUAR KIT is freeware.
73 / IPA, Ilpo Parviainen, JAGUAR Project
The software is provided "as is". The JAGUAR team takes no responsibility for any damage, which may occur as a result of using JAGUAR KIT. More comprehensive user support is available for JAGUAR PRO users only.
Antivirus software may block the KIT binaries so you may need to exclude KIT.exe and KITSAVER.exe from the antivirus checks before installing the software.
Download http://jaguars.kapsi.fi/KIT_V2.0.zip, unzip the package to C:\KIT and open the application.
JAGUAR KIT is not digitally signed so antivirus software may block downloading/running JAGUAR KIT. Many antivirus software use a heuristic approach to block unknown potential threats. This may happen, for example, if an application starts other programs (for example JAGUAR KIT uses KITSAVER.exe to recover from PC/program issues and ensure unattended 24x7 operation). The only task of KITSAVER.exe is to keep KIT.exe alive, i.e. start KIT if it is not active. This is why many antivirus software regard them as "trojans" or similar. Feel free to submit the samples of these executables to your antivirus software provider if you are suspicious. Unfortunately, whenever KIT.exe/KITSAVER.exe is re-compiled, for example after fixing a bug, whitelisting and reporting is required once more.
Click the SETTINGS icon on the KIT bar, and make the required settings, and just run KIT.
Before recording you may want to review/change the following settings:
Experiment with the SETTINGS > MESTOR entries on the settings panel, and you will see the recording schedule that matches your settings on the left side of the MESTOR panel.
When making sunrise/sunset based recordings, you must also fill in your LOCATION entry correctly: name, longitude, and latitude.
It may be that many DXers (especially those who are familiar with JAGUAR LITE or PRO) can use the basic functions of KIT without further instructions. We hope that the user interface is intuitive enough, and we encourage you to play with KIT without reading the instructions first :-)
But just in case you need more information/help and/or want to use the advanced KIT features: below you will find the details of all the JAGUAR KIT features.
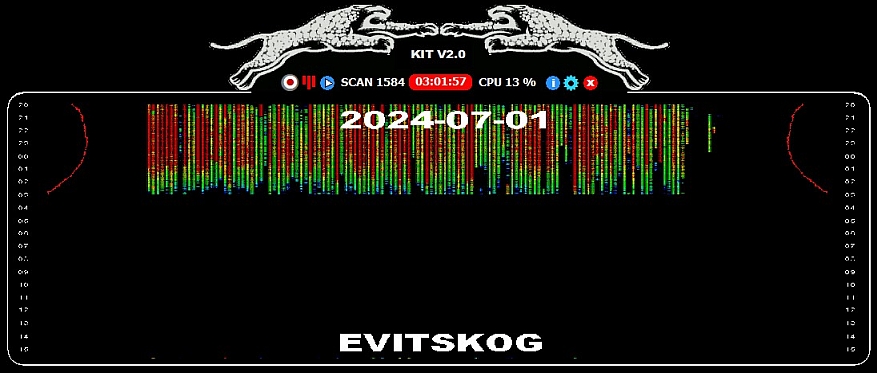
The main display of JAGUAR KIT is a small bar, placed on the top of the monitor screen. The location can be changed by dragging the bar to the left/right with the mouse. After starting KIT, the connection to the PERSEUS SDR is not made automatically: you must click the REC or PLAY button if immediate connection is needed, or just leave the bar, waiting for the next scheduled recording to take place (the connection will then be made automatically).
By default, the KIT bar shows six buttons and a status area at the center of the bar.
 REC: Start (and stop) manual recording. If manual recording is activated, it overrides all the scheduled recordings until recording is stopped manually.
 SHOW: Show the current MW status (YAS log image based on the selected frequency IMG_TARGET stepping: MW9 or MW10). You can close the image by right clicking on it. The image is available if you have "YAS_IMAGES" enabled in SETTINGS > OPTIONAL, more details below.
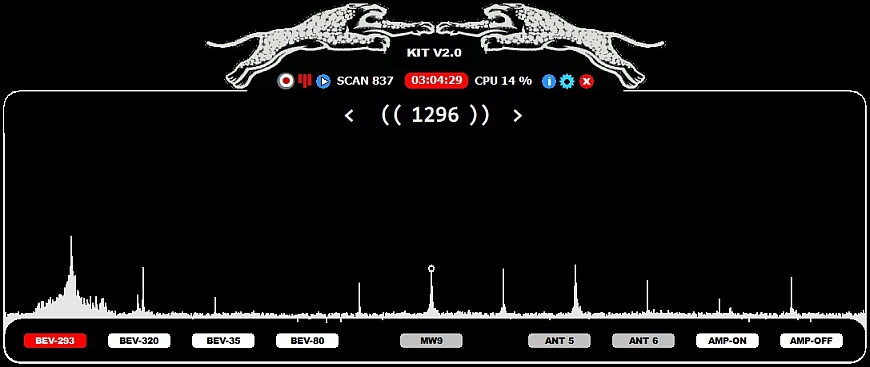
 PLAY: Start playback and open the playback window. The playback window includes a spectrum display and it supports the frequency tuning, MW9/MW10 channel toggling and antenna switching functions.
 INFO: Open the KIT infobox: Version, LIVESCAN details, performance counters and status/environment information.
 SETTINGS: Open the settings menu, more details below.
 EXIT: Shut down JAGUAR KIT (or return to the minimized KIT and stop playback, if you have any of the "big windows" active).

By default, the status area at the center shows the disk status (space used % on the recording disk), real time in UTC and the CPU used %. The color behind the real time shows the status of the PERSEUS SDR:
If LIVESCAN has been enabled, the system performs automatic offset analysis in the background. This processing is triggered frequently and when running, the disk status is replaced by the scan status information (= "SCAN freq", where "freq" is the currently analyzed frequency).
If you click on the PLAY button, KIT invokes the playback service: the playback window with the spectrum display will be opened. You can enter any MW frequency by typing it in and pressing ENTER. You can also scroll the frequencies with the mouse wheel or the left/right arrow keys - or clicking the < > symbols next to the frequency display. The frequency stepping used is either MW9 or MW10, you can change it by clicking the center button on the bottom bar or just clicking the frequency display. SSB can be changed with down-arrow key (LSB <> USB). The filter used is a fixed 3-kHz filter with no tuning options. The playback option is just meant for checking that "everything is OK" in the setup. Note that if you enter a frequency which is outside the MW9 or MW10 channels (for example, 917), KIT will use a frequency stepping of 1 kHz for scrolling the frequencies.

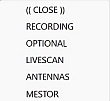
Clicking the SETTINGS button launches the SETTINGS menu with five options: RECORDING, OPTIONAL, LIVESCAN, ANTENNAS and MESTOR.
Primary settings for your KIT setup:
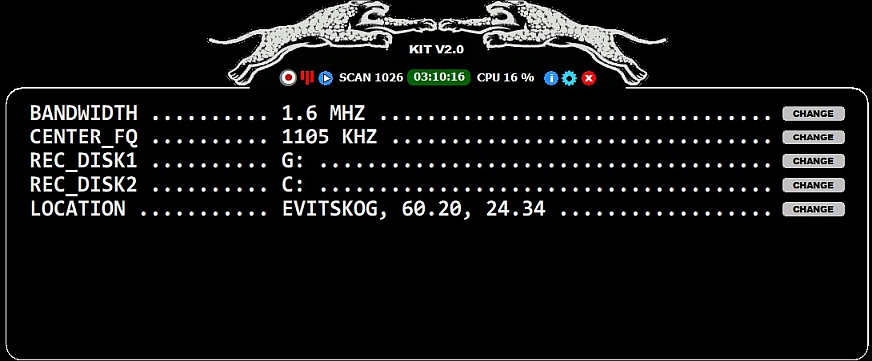
BANDWIDTH: Only 1.6 MHz and 2 MHz are available. If you use 1.6 MHz, you get the whole MW band recorded and save 20% of the disk space (compared to 2 MHz) but you cannot play the files with Perseus.exe. However, you can play these files with HDSDR or SDR Console. Those who want to play the files with Perseus.exe and/or include the LW band, must select 2 MHz.
CENTER_FQ: Define the center frequency (the suggested defaults are normally good: 925 kHz for 2 MHz and 1105 kHz for 1.6 MHz). It is not recommended that you use a "real" MW frequency (e.g. 927 kHz or 1107 kHz) because the center frequency usually generates a "false carrier" on the spectrum at the center frequency. Note that if you are interested in monitoring 1840 kHz, you must select 2 MHz and give a higher center frequency, for example 1055 kHz.
REC_DISK1: Define which hard disk you want to use to save your recordings. You can give a disk letter or an existing path (e.g. D:\RECS).
REC_DISK2: Define which hard disk to use if your primary hard disk (REC_DISK1) becomes full. If you use a folder name in the path name, that folder must be created manually beforehand on the REC_DISK2 disk.
LOCATION: Define your receive location (QTH), latitude and longitude. The QTH name is used in the MW status image (see SETTINGS > OPTIONAL > YAS_IMAGES). This information is also saved in the header of the recorded WAV file (for JAGUAR PRO users) and the latitude and longitude values (in degrees) are required if you use sunrise/sunset based recordings (see SETTINGS > MESTOR for more information). Note that DXers in the western hemisphere must give the longitude as a negative value. If SHOW is clicked, you will see today’s sunrise and sunset times in your location.
Optional additional settings for your KIT setup:
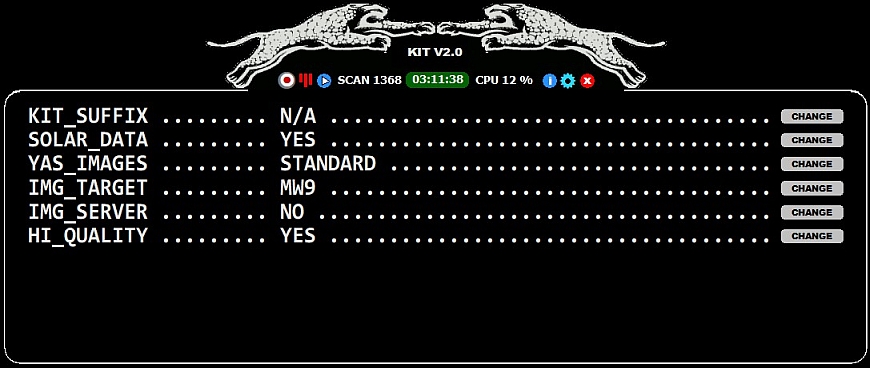
KIT_SUFFIX:
If your setup has only one antenna in use, there is no need to define anything to ANTENNAS. You can define an "antenna label" to KIT_SUFFIX and it will become a part of the rec file name.
SOLAR_DATA:
Collect solar cx data to JAGUAR rec files/displays (5 minute interval).
YAS_IMAGES: If STANDARD or ZOOMED is selected, the system collects status data about the MW channels always when the Perseus connection is active. With STANDARD the output image contains a shapshot of the MW band using a two-minute interval (showing the time period 20-17 UTC), with ZOOMEDthe output image contains a shapshot of the MW band using a one-minute interval (showing the time period 22-08 UTC). The image is saved in the rec folder with the name of "x.gif", and it can be displayed with SHOW.
IMG_TARGET: Select the MW channels (MW9 or MW10) that you want to monitor/show on the YAS images.
IMG_SERVER (for JAGUAR PRO users only): If YES, KIT uploads MW status images to the JAGUAR server at one-minute interval, making it easy to check the MW status of your remote setup from any browser at any time. The URL is of the format http://jaguars.kapsi.fi/gif.php?key=xxxxxxxx (replace xxxxxxxx by the 8-digit JAGUAR license key number of your JAGUAR PRO PC). This feature requires that you have enabled YAS_IMAGES.
HI_QUALITY:
If disabled, you'll get a performance benefit but the spectra may suffer from spurious signals, so normally this should be YES.
LIVESCAN creates the offset history for the desired frequencies. When enabled, KIT performs the standard JAGUAR PRO LIVESCAN. With KIT you can enable LIVESCAN also without the JAGUAR PRO registration, but for displaying the offset history you need the JAGUAR PRO software. LIVESCAN is fast and easy: the offset history analysis is created during normal operation using the 0.5Hz precision (even for all the MW9 and MW10 channels at the same time), no need to run separate "analysis jobs" after recording.
Detailed instructions for the LIVESCAN settings can be found on https://jaguars.kapsi.fi/GUIDE10/LIVESCAN.htm.
If you have a Devantech or Velleman relay board (or use a third-party antenna switcher module), you can define your antennas using the standard JAGUAR PRO antenna definitions.
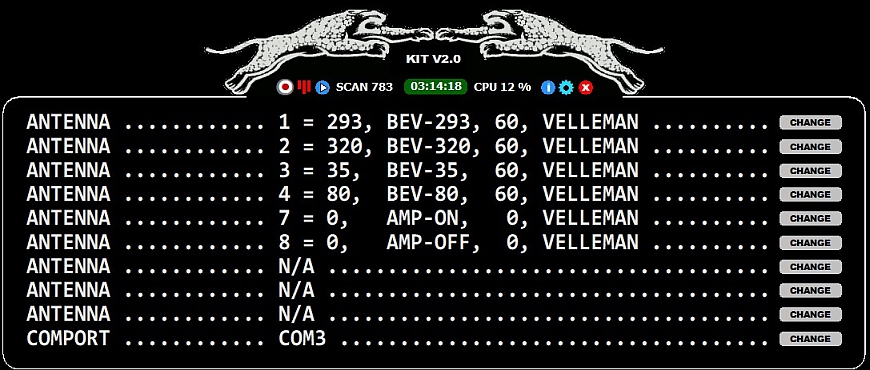
More details can be found in https://jaguars.kapsi.fi/GUIDE10/ANTENNAS.htm.
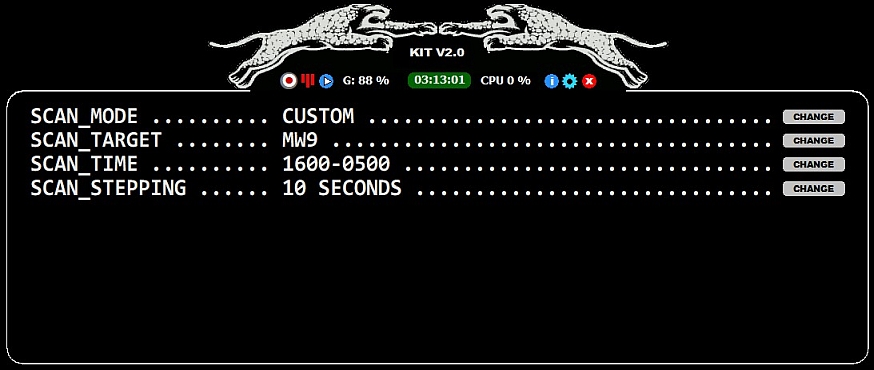
You have only nine lines available for defining your schedule for recordings. Nevertheless, you can generate fully adequate independent recording events with these nine entries! Detailed instructions for all the MESTOR settings can be found on https://jaguars.kapsi.fi/GUIDE10/MESTOR.htm.

Please note that if you use JAGUAR's AUTO_CALIBRATE function -- handy for example if you have a GPS Disciplined Oscillator GPSDO (Bodnar etc.) installed in your setup -- you must add "SET CALFREQ freq AT N/A" to MESTOR. This is a JAGUAR KIT extension, not mentioned in the JAGUAR's MESTOR settings.
KIT is designed for a care-free 24x7 operation of the PERSEUS SDR. In the unlikely event of a malfunction (i.e., a crash or hang), you will be notified and the malfunction can be recovered from with the help of an extra utility, KITSAVER.exe. KITSAVER monitors that KIT.exe is running smoothly, and makes KIT to restart if it is not running for any reason, e.g. after Windows operating system updates.
KITSAVER.exe maintains an error log (KITSAVER.log): a new line is written to that log whenever a problem occurs. "HANG" events are the most common indicating a problem in the USB I/O flow/disk access), solved by the automatic JAGUAR KIT restart.
To activate JAGUAR KIT automatically at the Windows start-up, create a shortcut for KITSAVER.exe, and place the shortcut in the Windows start-up folder.
JAGUAR KIT does not support the JAGUAR LITE/PRO keyboard shortcuts, however if you have any of the "big windows" visible, you can rotate all the available windows by clicking the keyboard key "N" (="NEXT").
It is possible to run 2 independent Perseus setups on one PC: install JAGUAR LITE/PRO for "Perseus #1" and install JAGUAR KIT for "Perseus #2". "Perseus #1" must be plugged in (and JAGUAR LITE/PRO must be connected to #1) first, after that "Perseus #2" can be plugged in (so that JAGUAR KIT always uses #2) - the order is important. Now both these setups can use own recording schedules/settings. When JAGUAR LITE/PRO is minimized, you'll see two KIT bars on the top of your display.
JAGUAR PRO offers a handy way for toggling/listening to these two setups: the playback antenna switcher ("PANTS") can be used for toggling #1 and #2 (also for simultaneously recorded files): https://jaguars.kapsi.fi/GUIDE10/PANTS.htm.
Please note that when running 2 x Perseus on one PC, the USB bandwidth/performance of the PC can become a bottleneck so please test your configuration thoroughly before leaving the setup to production.
JAGUAR KIT is the latest novelty in the JAGUAR software portfolio for the PERSEUS SDR. JAGUAR KIT takes care of all the background services needed for successful MW DXing. You can analyze the recorded files with your favorite SDR software but you can get the most out from the files with JAGUAR LITE/PRO. You can download the latest JAGUAR LITE/PRO software package from ourdownload site. By default, the JAGUAR software runs in the LITE mode but if you want to become a PRO user, and have fun with the HOTTEST MW SOFTWARE EVER, please send an email to jaguar4perseus at gmail.com for more information.