CUSTOM

When jumping from the PRO level to the CUSTOM level, you must
- Open the INFOBOX by pressing the keyboard key "i" (I = INFOBOX)
- Click the CHANGE button next to the IDENTITY ..... LEVEL PRO => the level will change to LEVEL CUSTOM
- When the CUSTOM level is activated, pressing TOOLBAR > SETTINGS will open a small popup menu:

- Click CUSTOM => CUSTOMBOX will open. All customizations are made using this window.
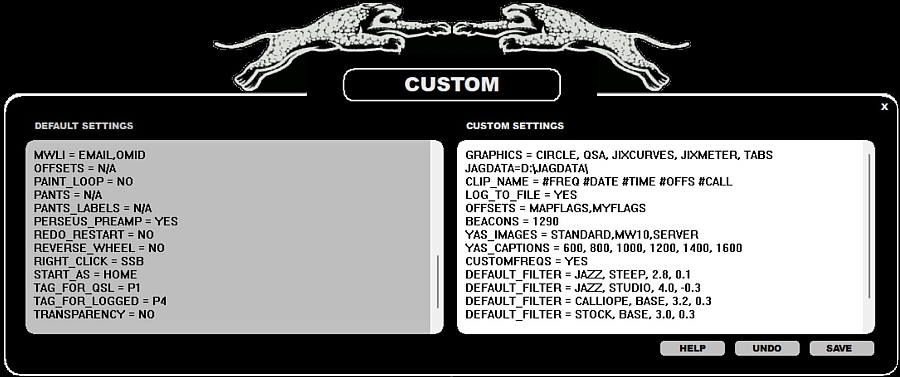
The default settings in the CUSTOMBOX are presented as grayed on the left,
you can type your personal override settings to the window on the right. You can also click the setting line
on the left to get a ready-to-edit template for the customization (the clicked template will be added
to the end of the right window.
In the beginning there are two customizations done "by the house": DEFAULT_FILTER and GRAPHICS settings. You can delete or edit these as you like.
The custom settings are saved to the CUSTOM.txt file in the SETTINGS folder. You can freely edit the settings also manually using any standard text editor. You can also copy the CUSTOM.txt file to your other JAGUAR V11 setups.
Each ANTENNA line consists of the antenna number and three parameters: direction, name, beam width (or scan target, see below).
The fourth parameter is optional: it can be either "VELLEMAN" or "DEVANTECH"
(if you use either of these antenna relay boards for the antenna switches)
or it can be any third-party antenna switch that can be invoked from the command line -
in that case the full path to that CMD/BAT file must be given as the fourth parameter.
If you use VELLEMAN or DEVANTECH, the antenna number also defines the relay number.
The third parameter (beam width) can be replaced by the default scan target of the antenna (MW9 or MW10).
If MW9 or MW10 is used, the system will change the LIVESCAN target automatically when the antenna is switched
(see GUIDE > LIVESCAN for more details).
ANTENNA = 1, 293, EASTCOAST, 60, VELLEMAN
Default = NO. If AUTO_CALIBRATE = YES, automatic calibration will be performed all
the time in the background, based on the current calibration frequency.
AUTO_CALIBRATE = YES is useful only if you have a stable calibration frequency
or an external GPSDO; otherwise this continuous auto-calibration mode may cause
annoying left-right spectrum jumps on the display. Default = N/A. Sometimes it is interesting to know what is the strongest station/frequency on the MW dial.
This can be always seen in the PEAK value on the STATUSBAR. Also in the LIVE mode, the CONDX > LIVE MAP display
shows the list of the strongest carriers on the selected MW stepping.
Sometimes there can be NDB frequencies on your local continent which appear to be the strongest
(for example in the Southern Finland the nearby Russian beacons are often the strongest frequencies on the MW10 channels).
In these cases you can eliminate those NDB frequencies from the PEAK / list with this BEACONS option. These BEACONS frequencies
are also used in skipping the NDB frequencies if you use the TOOLBAR > STRONGEST feature which can be used to show
the "strongest carrier list" on any JAGUAR display. Default = FREQS. Select the data shown on the bottom of the graphics area.
FREQS can be used for navigation
and direct jumps to frequencies. The brightness of the "freqency ball" is based on the signal strength
of the frequency.
LIST OF JAGUAR V11 CUSTOMIZATION OPTIONS
ANTENNA = antnumber, direction, antname, beam, 4th parameter
Default = N/A. If you have several antennas available in your setup, it is recommended to define them to JAGUAR.
If you have only one antenna, this parameter is not needed, but you may want to use the FILE_SUFFIX parameter (see below).
ANTENNA = 2, 320, MOUNTAIN, 60, VELLEMAN
ANTENNA = 3, 80, AUSTRALIA, 60, VELLEMAN
ANTENNA = 4, 35, OCEANIA, 60, VELLEMAN
ANTENNA = 8, 0, PREAMP_ON, 0, VELLEMAN
ANTENNA = 9, 0, PREAMP_OFF, 0, VELLEMAN
ANTENNA = 10, 0, RESET, 0 VELLEMAN
AUTO_CALIBRATE = YES | NO
BEACONS = fq1, fq2, fq3, ...
BOTTOM_BAR = FREQS | TRACKER | OFF


![]()
BREAKPOINT = MM
Default = DEFAULT (= 55 for 1.6MHz files or 56 for 2MHz files). By default JAGUAR always tries to center the TOH spot to the middle of the display. This means that JAGUAR makes an automatic file breakpoint (if possible) at HH:55:00 (if 1.6MHz files are used) or HH:56:00 (if 2MHz files are used). Some users want to adjust the file breakpoint to some other minute and this paramter makes it possible. You should define only the breakpoint minute near the TOH, the breakpoint minute near the BOT will be set automatically to MM+30. For example if you define BREAKPOINT = 58, the file breaks will happen at HH:58:00 and HH:28:00.CLIP_FOLDER = path_to_some_folder
Default = DEFAULT (= CLIPS folder located in the JAGUAR installation folder). This can be overridden by a user defined folder to be used for saving audio clips via CLIPPER (if the default or the JAGDATA folder can't be used, see JAGDATA below).
CLIP_NAME = xxx xxx xxx
Default = DEFAULT (= DATE TIME CLIP FREQ.mp3). If you start CLIPPER from the STATION MENU, the "CLIP" label is replaced by the station NAME.
You can override the default audio clip name with your own naming format using 4-character symbols:
#FREQ #DATE #TIME #NAME #CALL #SSB #LPRF (=log profile) and literals
For example, if you want your audio clip names to start with the frequency and use underscores in the name so that the clip files can be used in URLs, you can create the following naming template:
#FREQ_#CALL_#DATE_#TIME_IPA
which will generates clip names such as "1030_WBZ_2015-11-08_06'00'00_IPA.mp3"
COMPORT = COMx
Default = COM4. JAGUAR has a built-in support for the Velleman and Devantech antenna relay boards. The control of the relays use the Windows COM port and it must be defined with this COMPORT parameter, if it is not COM4 in Windows.CUSTOMFREQS = YES | NO
Default = NO. If CUSTOMFREQS = YES, the system will save the last used audio settings for each MW frequency and restores them automatically when you tune again to those MW frequencies.CUSTOMFREQS supports the selection of an optimal filter (STOCK | JAZZ | CALLIOPE) / mode (BASE | STEEP | STUDIO) / bandwidth / offset / SSB mode independently for each frequency. In addition, CUSTOMFREQS remembers one manual notch (position and size) for each frequency.
The settings are saved to the CUSTOMFREQS file in the JAGUAR folder (or in the JAGDATA folder, if that is used), and this file can be moved between computers.
DEFAULT_FILTER = filter, mode, bw, off
Default = STOCK, BASE, 3.0, 0.3. These default settings can be overridden by defining one or more DEFAULT_FILTER rows, for example
DEFAULT_FILTER = JAZZ, STEEP, 2.8, 0.1
DEFAULT_FILTER = JAZZ, STUDIO, 4.0, -0.3
DEFAULT_FILTER = CALLIOPE, BASE, 3.2, 0.3
DEFAULT_FILTER = STOCK, BASE, 3.0, 0.3
Your currently active DEFAULT_FILTER settings are always restored when you click the DEFAULT button on the AUDIOBOX or AUDIOBAR. If you have defined multiple DEFAULT_FILTER rows, you can change your currently active DEFAULT_FILTER by moving the mouse cursor over the DEFAULT button and scrolling with the mouse wheel and/or left/right arrow keys. This scrolling can also be used for quick analysis how some specific station can be heard with different filter specs: these DEFAULT_FILTER rows can be used as a predefined set for various filter characteristics when studying some challenging audio output.
DIAL = name, fq1, fq2, fq3, .....
Default = N/A. You can define a maximum of 40 "memory banks". In JAGUAR these memory banks are called DIALS and each DIAL definition contains a short name and a list of frequencies. DIALS can be used for creating frequency lists for stations that belong to the same area or network or whatever criteria you prefer.DIAL must have a name followed by a list of frequencies, frequency ranges and/or ITU codes. If ITU codes are used, the system will replace the ITU code by all the MW frequencies for that specific country.
DIAL = Graveyard, 1230, 1240, 1340, 1400, 1450, 1490
DIAL = Hot, 1190, 1560, 1580
DIAL = Algeria, ALG
DIAL = South Africa, AFS, AGL, BOT, MWI, MOZ, 1170
DIAL = X-Band, 1610-1710
Each DIAL can be activated by loading it to VFO: when clicking TOOLBAR > VFO, you'll get the popup menu for the available DIALs. After that it is easy to scroll the frequecny list and spot parallel programs over several frequencies.

DRAGGER = YES | NO
Default = NO. This means that the visible spectrum on the SPECTRA display can be dragged only vertically. DRAGGER = YES allows dragging also horizontally.
DUALMON = xresolution, yresolution, xadjust
Default = N/A, N/A, N/A. Show JAGUAR's main display on an alternative monitor. The desired X-resolution and Y-resolution must be given. These values may need to be trimmed from the default resolution values in order to get a full screen display. xadjust can be used for finetuning the left x-position of JAGUAR with the number of pixels given.
FILE_SUFFIX = xxx
Default = N/A. If your setup has only one antenna available, there is no need to use the ANTENNA parameter. However it is often useful to have some fixed label as part of the rec file name - either the antenna name or the QTH name where the recording has been made. You can add such a label using this FILE_SUFFIX parameter, the string given is added to the end of the rec file name.GRAPHICS = option1, option2, option3, .....
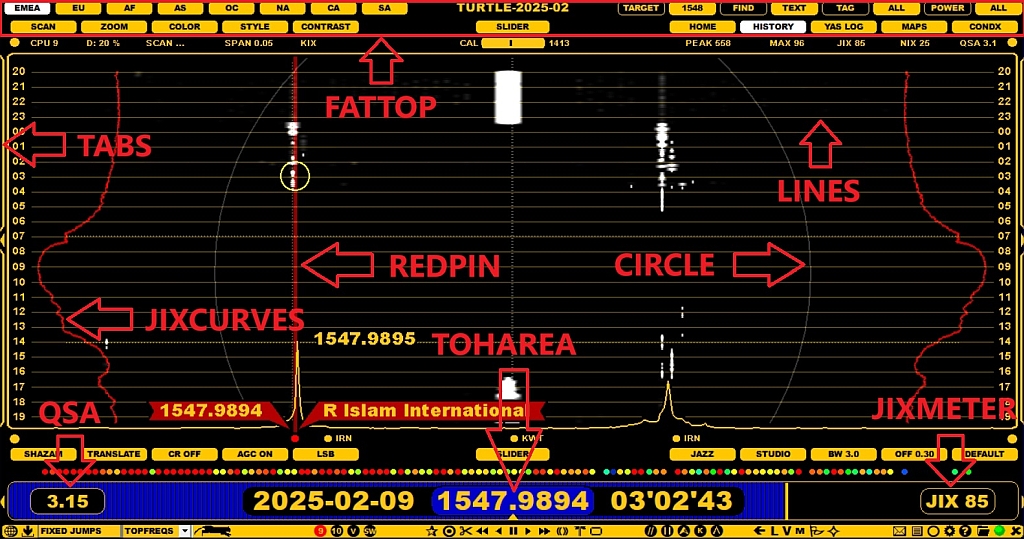
Default = TOHAREA, CIRCLE, JIXCURVES. You can tailor the visible graphics elements on the JAGUAR displays using the GRAPHICS parameter. The list can contain as many options as you want. The default option list gives the JAGUAR V10 outlook. The valid options are:
TOHAREA - Top-of-the-hour area ("ID AREA") on the PLAYBAR for files containing TOH
CIRCLE - Center circle for the spectrum, the size is based on the zoom level
JIXCURVES - Red JIX curves on the SPECTRUM HISTORY and YAS LOG
LINES - Horizontal lines on the SPECTRUM and YAS LOG displays
QSA - Current QSA value on the left end of the PLAYBAR
JIXMETER - Current JIX value on the right end of the PLAYBAR
TABS - "Frame tabs" on the edges: the areas where hovering the mouse cursor triggers HEARD/DAYLOG/AUDIOBOX/PLAYBOX
REDPIN - Red playback offset pointer / red "spot-on" calibration pointer.
FATTOP - DATABASE BAR is always kept visible on the top
HI_QUALITY = YES | NO
Default = YES. If this is set to NO, you'll get a performance benefit but the spectra may contain some spurious signals.
HIBERNATE = HHMM
Default = N/A. The user-defined time in UTC for the daily PC hibernation. HHMM must be replaced by the desired time, e.g. HIBERNATE = 1410. Don't use this option if you have enabled the MESTOR controlled hibernation.
HOMESCAN = XX
Default = 10. You can define the "density" of the HOMESCAN spectrum preview, XX given as seconds. This parameter defines the spectrum snapshot interval when you tune to a new frequency on the HOME display.
JAGDATA = path_to_some_folder
Default = N/A. If no JAGDATA is given, all the "user data" is saved to the Jaguar installation folder. If you make a fresh JAGUAR installation to a new folder, you normally want to use your existing TURTLE databases, loggings etc. also in that new environment. This requires quite a lot of file copies, unless you use the JAGDATA parameter which makes your personal DX data independent from the JAGUAR setups/versions. If "JAGDATA=folder" is given, all the user data is saved to that folder instead of the Jaguar installation folder. In addition, you can also define this folder to Dropbox if you want to sync all user data between your local and remote setups.
If you deploy this feature, at first you must create that folder manually and move all the existing "user data" to this new folder - after that JAGUAR takes care of the maintenance.
The "user data" consists the following files and folders:
- TURTLE folder
- CLIPS folder
- LOGS folder
- MAIL folder
- SHOTS folder
- STREAMS folder
- FILEBOX folder

- OFFSET.txt file
- STREAMS.txt file
- LOG_PROFILES.txt file
- BEEHIVE.txt file
- CUSTOMFREQS file
KEEP_MAXIMIZED = YES | NO
Default = NO. If KEEP_MAXIMIZED = YES, JAGUAR will stay in the full-screen mode. JAGUAR will not automatically enter the minimized mode. Normally, the minimized mode is invoked if there is no user activity in one hour. It is not recommended to keep this enabled in unattended operations: the minimized mode minimizes the resource consumption.
LOGMODE = xxx xxx xxx
Default = DEFAULT. You can customize this logging row format. The output row can be freely customized with fixed literal strings and LOGMODE keywords. Each keyword is four characters long, preceded by #. JAGUAR translates the keyword to its value while logging. The valid parameters are as follows:
#NAME #FREQ #DATE #TIME #CALL #ITUC #USER #USRN #OFFS #QSAC #ZONE #YYYY #MMMM #DDDD
#HHHH #MINS #MNTH #SECS #FILE #LINE #DIST #COMM #TENT #SINP #CLAT #CLON #SSBC #CALX
#NAMX #ANTX #LPRF #TABS
For example, when the LOGMODE is
#FREQ #TIME #NAME #COMM #USER
the log line contains frequency, time, station name, comments and userid.
When the LOGMODE is
#FREQ;#CALX;#NAMX-#COMM;#SINP;#HHHH#MINS;#DDDD/#MMMM;USER
it will generate an optimal logging line for the MWC log format; #CALX and #NAMX will generate strings designed for MWC in mind. USER must be replaced by the user initials used in MWC, which may be different from #USER which generates the JAGUAR userid. All values are separated by a semicolon, so the output file can also be loaded to Excel.
LOG_PROFILES = YES | NO
Default = NO. You can define a maximum of three log profiles. These profiles are useful if you want to make loggings to several publications with one single logging action. This is a deprecated feature but still available for those who have deployed it in the past.
LOG_TO_DAYLOG = YES | NO
Default = YES. If LOG_TO_DAYLOG = YES, clicking SUBMIT in the LOGBOX adds the logging to DAYLOG.
LOG_TO_FILE = YES | NO
Default = NO. If LOG_TO_FILE = YES, clicking SUBMIT in the LOGBOX adds the logging to the LOG.CSV file.
LOG_TO_MWLI = YES | NO
Default = NO. If LOG_TO_MWLI = YES, clicking SUBMIT in the LOGBOX sends the logging to MWLI. If this feature is enabled, you will also need to define the "MWLI"-parameter, see below.
MWLI = EMAIL, OMID
Default = N/A. If you want to send your loggings to MWLI, you need to fill your MWLI credentials here.
EMAIL - the email address which you have registered with MWLI
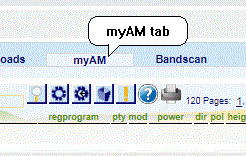
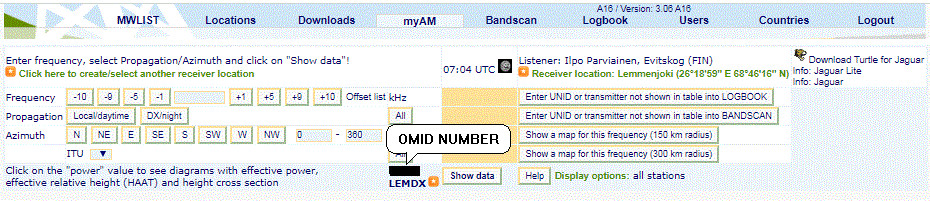
OMID - the numerical value found in your MWLI profile under MWLI's "myAM" properties tab.
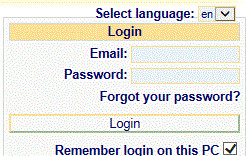
If you are unsure of your omid number, you can check it by logging in to the MWLI at https://www.mwlist.org, clicking the "myAM" tab and picking up the number shown below the "myAM" on the details page.
OFFSETS = option1, option2
Default = N/A. Two additional options are available for the offset control, you can add one or both of them.
MYFLAGS - The system will support personal offset flags, these offsets are saved / maintained in your local setup only
MAPFLAGS - The system allows displaying the offset flags also on the map displays
PAINT_LOOP = YES | NO
Default = NO. If PAINT_LOOP = YES, a playback loop can be simply painted on the PLAYBAR using the mouse cursor.
PANTS = two-different-recording-paths-separated-with-comma
Default = N/A. Compare two recordings recorded at the same time. See details in GUIDE > PANTS.
PANTS_LABELS = label1,label2
Default = N/A. When using the PANTS feature, you can give short names (max 6 characters) to the recorded file sets, for example the labels can be ANT290,ANT335 showing the antenna directions.
PERSEUS_PREAMP = YES | NO
Default = YES. If PERSEUS_PREAMP = NO, the internal amplifier of the Perseus hardware will be set OFF.
REDO_RESTART = YES | NO
Default = NO. If there's a break/crash in the overnight recording and the automated restart/connection fails due to (potential) USB issue, this REDO_RESTART will retry the whole restart process until the Perseus connection finally succeeds (note: if USB (/disk/Perseus) is totally unavailable, this will cause an eternal restart loop. Use this with care, because normal power breaks etc. are handled correctly without this parameter.
REVERSE_WHEEL = YES | NO
Default = NO. If REVERSE_WHEEL = YES, the direction of mouse scrolling is reversed in the main operations.
RIGHT_CLICK = SSB | AUDIOBOX | FLAGS
Default = SSB. The RIGHT_CLICK functionality of the mouse on the graphics area can be selected from the following options:
SSB - Toggle between LSB and USB.AUDIOBOX - Open the AUDIOBOX.
FLAGS - Show/hide the offset flags.
START_AS = HOME | YAS LOG | MINIMIZED
Default = HOME. Select the display screen what is shown right after the JAGUAR start. If START\_AS = MINIMIZED is selected, JAGUAR will stay idle (no connection to Perseus) until a playback or recording request is activated.
TAG_FOR_QSL = Px
Default = P1. JAGUAR will use the WHITE color (P1) for the QSLed stations on MAPS / TURTLE by default. This can be overriden using a different tag value in TAG_FOR_QSL. For example, TAG_FOR_QSL = P2 will change the default to red.TAG_FOR_LOGGED = Px
Default = P4. JAGUAR will use the BLUE color (P4) for the logged stations on MAPS / TURTLE by default. This can be overriden using a different tag value in TAG_FOR_LOGGED. For example, TAG_FOR_LOGGED = P3 will change the default to black.
TRANSPARENCY = YES | NO
Default = NO. If TRANSPARENCY = YES, the SPECTOR peaks are displayed transparent, i.e. FLAGS, etc. can be seen behind the SPECTOR peaks.
YAS_IMAGES = Param1, Param2, Param3
Default = NO, MW10, LOCAL. By default JAGUAR does not create daily YAS LOG thumbnail images (named as x.gif) to the recording folder.If you want these images, please change param1 and optionally param2 and param3:
Param1: STANDARD or ZOOMED. STANDARD will show one snapshot line per two minutes, the ZOOMED option gives one snapshot line per one minute starting from 22 UTC. Using the ZOOMED option, your x.gif files show less hours per day but with a better resolution.
Param2: MW10 or MW9. Define the target frequencies shown in the image.
Param3: LOCAL or SERVER. LOCAL saves the images only to your local PC, but if SERVER is defined, JAGUAR automatically uploads the YAS LOG images to the kapsi.fi server. The images on the server are refreshed once an hour, and they can be viewed via any browser using this URL: http://jaguars.kapsi.fi/jagnet/jagthumb_12345678.gif. Replace "12345678" with your JAGUAR key, as shown in INFOBOX.
For example
YAS_IMAGES = STANDARD, MW10, SERVER
will create standard x.gif images to the rec folder for the MW10 channels and the images are also uploaded to the Kapsi server once in an hour.
YAS_CAPTIONS = fq1, fq2, fq3, ...
Default = N/A. If you want to show frequency labels on the top of the YAS LOGs and YAS LOG images, you can define those captions by listing the desired frequencies with YAS_CAPTIONS.For example
YAS_CAPTIONS = 600, 800, 1000, 1200, 1400, 1600
will show the corresponding frequencies on the top of the YAS LOGs.
